Spring boot videos explanatiton
Author @Saief1999
Section 1 : Introducing spring 5.0
Video 1.2 : what is spring ?
Spring : an open source java based application framework, the latest major stable release is version 5.0 . It is module based.
Modules include :
- Spring core container : Base module with
BeanFactoryandApplicationContext - Security : authentication / authorization (OAuth 2.0 )
- IOC : lifecycle management with dependency injection
- MVC : Used for creating RESTful web services
- Data access : Database management systems (
jdbcaccess ... )
Spring Boot :
- Easy to use solution for creating a standalone Spring application with minimal effort & minimal configuration
- support for embedded tomcat , curated maven dependencies & simplified security
- behind the scenes, Spring boot uses Spring 5.0
Video 1.3 : Choosing an IDE ?
- List of tools are available in this link https://Spring.io/tools .
- in this tutorial we're gonna use IntelliJ
check student pack for IntelliJ ultimate version
To create a new project
New project > Maven > fill groupId and artifactId > choose location > create
Video 1.4 : Setting Up Maven
- Maven: Software project build management tool providing a standard way for creating and managing java projects .
- dependencies : packages you software relies on.
Adding dependencies
We start by copying this dependency from https://mvnrepository.com/artifact/org.springframework.boot/spring-boot-starter-parent
<dependency>
    <groupId>org.springframework.boot</groupId>
    <artifactId>spring-boot-starter-parent</artifactId>
    <version>2.4.2</version>
    <type>pom</type>
</dependency>
we change it to parent and we delete the type attribute.
In pom.xml
<parent>
    <groupId>org.springframework.boot</groupId>
    <artifactId>spring-boot-starter-parent</artifactId>
    <version>2.4.2</version>
</parent>
parent dependencies : avoid redundancies and duplicate configuration in project (multiple version for example)
we add spring-boot-starter-web to pom.xml
<dependencies>
<dependency>
    <groupId>org.springframework.boot</groupId>
    <artifactId>spring-boot-starter-web</artifactId>
    <version>2.4.2</version><!-- this can be deleted-->
</dependency>
</dependencies>
To Download the dependencies
right click project > maven > download sources and documentation
Video 1.5 : Creating a Run Configuration
Creating the main class
In src/main/java/main.java
public class Main {

  public static void main(String[] args) {
    System.out.println("Hello");
  }
}
adding Run Configuration
To add a run configuration we do :
Add run configuration < + < Application < name it ' Demo Run ' < Select Main.java as Main Class < Apply
Video 1.6 : Running a Spring Application
configuring main class
We move our Main class to com.demo and add necessary configuration
In src/main/java/com.demo/main.java
package com.demo;

import org.springframework.boot.SpringApplication;
import org.springframework.boot.autoconfigure.SpringBootApplication;

@SpringBootApplication
public class Main {

  public static void main(String[] args) {
    SpringApplication.run(Main.class, args);
  }
}
Creating a Rest Controller
In src/main/java/com.demo/RestController.java
package com.demo;

import org.springframework.web.bind.annotation.RequestMapping;

@org.springframework.web.bind.annotation.RestController
public class RestController {

  @RequestMapping("/hello")
  public String helloWorld() {
    return "hello World"; // this will return hello world as html
  }
}
Section 2 : Working with Spring IOC
Video 2.1 : Introducing IOC ?
Inversion of control :
a software design principle where parts of the software receive flow of control , for example from another framework.
instead of the custom code calling the library . We have the framework calls the custom code.
Used for decoupling execution of a task from actual implementation to avoid problems
Separates what to do (defined by the interface) from where to do (a component implementing that interface)
Dependency Injection :
- one way of achieving inversion of control
- control is inverted via setting other objects that an existing object depends on
- Various ways (Setter-based DI / Field Based DI / Interface-based DI / Constructor-based DI)
Example Of Inversion of control
A printer that uses a document
Instead of using the Document in the Printer as an attribute. We create a DocumentInterface and we use it inside the Printer instead.
Video 2.2 : Dependency Injection with Annotations
- Annotations : metadata that is added to java source Code
- Examples :
@overrideand@SuppressWarnings - Are processed by annotation processors
- Examples :
Annotations in Spring
- to inject dependencies, the
@Autowiredannotation is commonly used in spring - In addition we have (will be explained later) :
@Qualifier(DI by qualifier)@Componentand@ComponentScan(DI by name)
Video 2.3 : Introduction to the @Component Annotation
Spring Beans :
- Custom objects instantiated and managed by the Spring IOC container.
- every bean require a definition for creating the actual instances of the bean object later
@Component :
- used to mark a classes as Spring managed components -> Beans.
@ComponentScancan be used to scan the class path and creates beans of classes annotated with@Component- @Bean and @Component both are used to create Beans
- @Bean : declared a bean on the method level (we annotate a method to make it return a Bean), can only be used on configuration classes(@Configuration).
- @Component : operates on the class level
Creating our First Bean
- We create a class named
Greeter.java. We Annotate it with@Component
In /src/main/java/com.demo/Greeter.java
package com.demo;

import org.springframework.stereotype.Component;

@Component
public class Greeter {

  String greet() {
    return hello;
  }
}
Video 2.4 : Introduction to the @Autowired Annotation
- Annotation for auto-wiring(resolving beans via setter , constructor , or field
- if a field is annotated
@Autowired(required=true), Spring tries to resolve the annotated field and performs dependency injection - If the required property is set to
false, Spring won't throw exceptions of unresolved beans
In /src/main/java/com.demo/Greeter.java
import org.springframework.beans.factory.annotation.Autowired;
//...
    private Greeter greeter ;

    @RequestMapping("/hello")
    public String helloWorld(){
        return greeter.greet();

    }
//...
- if we want to disable exception throwing for a field if the bean doesn't exist
In /src/main/java/com.demo/NotABean.java
package com.demo;

public class NotABean {}
In /src/main/java/com.demo/RestController.java
//...
@Autowired(required = false)
private NotABean notABean ;
//...
This will work without exceptions !
Video 2.5 : Dependency Injection with the @Autowired Annotation
- the
@Autowiredannotation has different executions paths that define which way@Autowireddependencies are resolved- Match via the type (default)
- match via the field name
- Match via the qualifier by an additional
@Qualifierand using@Component(value=specifiedValue)
Example
- We create an interface for our bean
In GreetInterface.java
package com.demo;

public interface GreetInterface {
  String greet();
}
- now we add a second Bean implementing the same interface
In FriendlyGreeter.java
package com.demo;

public class FriendlyGreeter implements GreetInterface {

  @Override
  public String greet() {
    return "Friendly Greeting";
  }
}
In Greeter.java
package com.demo;

import org.springframework.stereotype.Component;

@Component
public class Greeter implements GreetInterface {

  @Override
  public String greet() {
    return "hello";
  }
}
In RestController.java
//...
    @Autowired
    private GreetInterface greeter ;
    @Autowired
    private GreetInterface friendlyGreeter ;

    @RequestMapping("/hello")
    public String helloWorld(){
        return greeter.greet();
    }
    @RequestMapping("/hellofriendly")
    public String helloFriendly(){
        return friendlyGreeter.greet()  ;
    }
//...
IMPORTANT :
- In this case, spring uses the Attribute Name as an indication for the bean that needs to be instantiated
- If we change the Attribute Name (
friendlyGreetertofriendlyGreeter1for example) Spring won't be able to recognize which class (Already two components implement this interface ). - Therefore, We need to Use @Qualifier(value="...") or @Primary or @Component(value="...")
Solution 1 : Adding @Component(value="specificName")
In Greeter.java : We add value Field for @Component
@Component(value="greeter1")
public class Greeter implements GreetInterface{
In RestController.java : We leave the name as it is
@Autowired
private GreetInterface greeter1 ;
- The problem here, since we're using the interface, we should Name our Attribute exactly as it's mentioned in the component.
Solution 2 : Using @Qualifier(value="beanName")
In RestController.java : We add @Qualifier and we specify the beanName
//...
@Autowired
@Qualifier(value="friendlyGreeter")
private GreetInterface friendlyGreeter1 ;
//...
Solution 3 : Using @Primary
In Greeter.java : We add value Field for @Component
@Component
@Primary
public class Greeter implements GreetInterface {
  //class body
}
- In case of a conflict, the Primary bean will be instantiated.
Section 3 : Working with Spring Beans
Video 3.1 : Introduction to Spring Beans
- @Bean
- Can be used for methods in configuration classes ( annotated with
@Configuration), to register the return value of a method as a Spring Bean. - Declared at the method level (whereas
@Componentis declared at class level ) - the bean name is the same as the method name (default)
- Can be used for methods in configuration classes ( annotated with
Example : Class Based Configuration of components
We delete @Component from our classes
In
GreeterConfiguration.java:
We annotate class
@ConfigurationWe add methods
GreeterandFriendlyGreeter, and annotate them with @BeanWe make them return the wanted objects
package com.demo;

import org.springframework.context.annotation.Bean;
import org.springframework.context.annotation.Configuration;

@Configuration
public class GreeterConfiguration {

  @Bean
  public GreetInterface greeter() { // first letter lowercase like the attribute name !
    return new Greeter();
  }

  @Bean
  public GreetInterface friendlyGreeter() {
    return new FriendlyGreeter();
  }
}
IMPORTANT :
- The attribute name Should match the method name when requesting the bean.
Video 3.3 : Spring Bean Scopes
Bean Scope : bean scope in spring influences its life cycle and exposure (visibility) to other components.
Currently, Spring supports six different scope types.
Annotated via @Scope
Most commonly used
- Singleton (Default) : only a single instance of an object exists in an application context
- Prototype : A new instance is created every time the bean is requested from the IOC container.
Less commonly used
- Web-aware scopes : Can only be used in a web aware application context
- Request : Scoped to the life cycle of a single HTTP request.
- Session Scope : Scoped to the life cycle of a single HTTP session, a session usually holds information across multiple requests.
- Global Session : scoped to the life cycle of a global HTTP session.
- Application : Instance of the bean is shared across the SevletContext
- Web-aware scopes : Can only be used in a web aware application context
Singleton and Request Scopes (Example)
In
GreeterConfiguration.java:- We add @Scope from both Methods
- We change the return types ( so we can change our attribute names later on )
@Configuration
public class GreeterConfiguration {

  @Bean
  @Scope(value = "prototype")
  public Greeter greeter() {
    return new Greeter();
  }

  @Bean
  @Scope(value = "singleton")
  public FriendlyGreeter friendlyGreeter() {
    return new FriendlyGreeter();
  }
}
In
GreeterBase.javaWe add a variable to observe the scope of our beanspackage com.demo;
public abstract class GreeterBase implements GreetInterface {
protected int greetCount = 0;
}In
GreeterandFriendlyGreeter:- We extends the abstract class
- we increment the variable at each call
package com.demo;

public class Greeter extends GreeterBase {

  @Override
  public String greet() {
    greetCount++;
    return "hello " + greetCount;
  }
}
In
RestController.java- we add new attributes
- We add necessary endpoints
- We change attribute types
@Autowired
private Greeter greeter1 ;
@Autowired
private FriendlyGreeter friendlyGreeter1 ;
@Autowired
private Greeter greeter2 ;
@Autowired
private FriendlyGreeter friendlyGreeter2 ;@RequestMapping("/hellofriendly1")
public String helloFriendly(){
return friendlyGreeter1.greet() ;
}
@RequestMapping("/hello1")
public String helloWorld(){
return greeter1.greet();
}
@RequestMapping("/hellofriendly2")
public String helloFriendly2(){
return friendlyGreeter2.greet() ;
}
@RequestMapping("/hello2") public String helloWorld2(){ return greeter2.greet(); }
**NOTES** :

- when we go to `/hello1` : it keeps incrementing (instance of the bean greeter requested only once )
- when we go to `/hello2` :

- a new instance for the bean greeter is requested , it's scope is **prototype** so a new object will be created .
- We have a new Greeter with a new Counter , That keeps incrementing **independently of** `/hello1`

- When we go to `/hellofriendly1` :
- a new Instance of the bean `FriendltyGreeter` is requested. It will be returned and the counter will keep incrementing
- When we go to `/hellofriendly2` : a new instance is requested. the bean's scope is **singleton** so the same object will be returned ( counter **shared** between both endpoints )

#### Request Scope (Example)

In `GreeterConfiguration.java` : We change the scope of `FriendlyGreeter` bean .

```java
//...
@Bean
@Scope(value= WebApplicationContext.SCOPE_REQUEST,proxyMode = ScopedProxyMode.TARGET_CLASS)
public FriendlyGreeter friendlyGreeter()
{
 return new FriendlyGreeter() ;
}
- each Call for
/hellofriendly1/hellofriendly2creates a newFriendlyGreeterbean instance.
Video 3.4 : Spring Bean Life Cycle and Callbacks
Spring bean life cycle :
- describes the entire span of existence of a spring bean
- This starts with the bean creation by the IOC container , ends with its destruction.
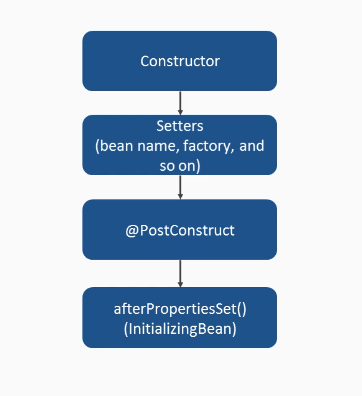
Simplified bean initialization life cycle
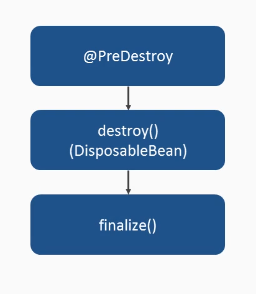
- Simplified bean destruction life cycle
- Lifecycle interfaces (bean implements interface & overrides methods ) :
- InitializingBean : Interface that allows callbacks during initialization process of a bean.
- DisposableBean : Interface that allows callbacks during the destruction process of a bean.
- Lifecycle Annotations :
- @PostCostruct : Annotation that can be used to annotate the methods of a bean that should be called after the bean has been initialized by the IoC container
- @PreDestroy : Annotation that can be used to annotate the methods of a bean that should be called when a bean is about to be destroyed.
Example (Interfaces)
In FriendlyGreeter.java
public class FriendlyGreeter
  extends GreeterBase
  implements InitializingBean, DisposableBean {

  @Override
  public String greet() {
    greetCount++;
    return "Friendly Greeting " + greetCount;
  }

  @Override
  public void afterPropertiesSet() throws Exception {
    System.out.println("afterPropertiesSet");
  }

  @Override
  public void destroy() throws Exception {
    System.out.println("destroy");
  }
}
Notes :
The bean scope is request .So for each request a new instance is created then destroyed . For each request we see :
afterPropertiesSetdestroyIf the bean scope is singleton (default). the bean will be instantiated (
afterPropertiesSetshows up ) with application startup . and will be deleted (destroywill show up ) with application shutdown.
Example (Annotations)
In FriendlyGreeter.java
//...
@PostConstruct
private void postConstruct()
{
    System.out.println("postConstruct");
}

@PreDestroy
private void preDestroy(){
    System.out.println("preDestroy");
}
//...
- Order is the following for Singleton Scope :
//during startup
postConstruct
afterPropertiesSet

//during shutdown
preDestroy
destroy
Video 3.5 : Spring Property Files
- Property files : used to provide additional application data ( example
db connexion URL) - To read Property files we use @ConfugurationProperties
- it it used to externalize configuration data and separate it from beans
- Annotation a class that has
@Configurationto make it read properties from certain configuration files ( example :application.yml)
Spring Property Files Example
- in
src/main/resources: we createapplication.yml
database:
  url: url-to-database
  username: database-user
- in
src/main/resources: we createDatabaseConfiguration.java- we add
@ConfigurationProperties(prefix="parentProperty") - we add properties as fields
- We add getters/setters
- It's a
@componentnot@Configuration!! (so we can do@Autowiredlater)
- we add
@Component
@ConfigurationProperties(prefix = "database")
public class DatabaseConfiguration {

  private String url;
  private String username;

  public String getUrl() {
    return url;
  }

  public void setUrl(String url) {
    this.url = url;
  }

  public String getUsername() {
    return username;
  }

  public void setUsername(String username) {
    this.username = username;
  }
}
- in
GreeterConfig.java:- we use our
DatabaseConfigurationas@Autowired - We pass it to the constructor of the bean
- we use our
//...
@Autowired
private DatabaseConfiguration databaseConfig ;

    @Bean
    public FriendlyGreeter friendlyGreeter()
    {
        return new FriendlyGreeter(databaseConfig) ;
    }
//...
- in
FriendlyGreeter.java: we pass the config in the constructor- we don't need
@Autowiredfor the attribute ( it's passed to the constructor via the Configuration File of the beanGreeterConfiguration.java)
- we don't need
//...
private DatabaseConfiguration config ;

 FriendlyGreeter(DatabaseConfiguration config)
 {
     this.config=config;
 }
//
Result : Friendly Greeting 4 database-user url-to-database
Section 4 : Spring Data
Video 4.1 : Introduction to Spring Data
Spring Data :
- simplifies database implementation
- provides an abstract, interchangeable and consistent way for data access
spring data supports this database solutions:
- JDBC
- java persistence API (JPA)
- MongoDB
- Couchbase
H2 :
- Database management system for java-based applications
- fully supported by Spring Boot
- Default configuration in Spring Boot is the in-memory storage (the data is lost on application restart)
Video 4.2 : Spring Data Dependencies
- Required Dependencies :
- Spring Boot Data JPA dependency :Provides the basis for working with java-based database solutions.
- H2 database dependency.
In pom.xml :
- We add the
H2andJPAdependencies - We delete the versions (already mentioned in the parent)
- We change the scope of h2 from
testtoruntime
<dependency>
    <groupId>org.springframework.boot</groupId>
    <artifactId>spring-boot-starter-data-jpa</artifactId>
</dependency>

<dependency>
    <groupId>com.h2database</groupId>
    <artifactId>h2</artifactId>
    <scope>runtime</scope>
</dependency>
Video 4.3 : Creating a Data Model
- Data Model :
- Java class representing an entity/object in the database.
- JPA Annotations : used for database model creation
- @Entity : marks a java class as an Entity stored in DB
- @Id : Marks a field as the unique identifier of the entity
- @GeneratedValue : marks a field representing an automatically generated value.
Creating a Data Model Example
In Customer.java
package com.demo;

import javax.persistence.Entity;
import javax.persistence.GeneratedValue;
import javax.persistence.Id;

@Entity
public class Customer {

  @Id
  @GeneratedValue
  private Long id;

  private String name;

  private int age;

  public Long getId() {
    return id;
  }

  public void setId(Long id) {
    this.id = id;
  }

  public String getName() {
    return name;
  }

  public void setName(String name) {
    this.name = name;
  }

  public int getAge() {
    return age;
  }

  public void setAge(int age) {
    this.age = age;
  }
}
Video 4.4 : Setting Up a Repository
Repository<T, ID> :generic interface all repositories inherit from
- T : data type the repository stores
- ID : type of the identifier ( annotated with @Id in the model )
CrudRepository<T, ID> extends Repository(T,ID) : generic interface supporting CRUD operations
- Create ->
save(...) - Read ->
find(...) - Update ->
save(...) - Delete ->
delete (...)
- Create ->
PagingAndSortingRepository<T, ID> extends CrudRepository <T,ID>
- supports key aspects of pagination
- finding entities matching certain conditions ->
findAll(...)
JpaRepository<T,ID> extends PagingAndSortingRepository<T,ID> extends PagingAndSortingRepository<T,ID>
- JPA-specific extension of repository
- JPA-specific queries ->
getOne(...)
To Create a Repository
- Create an interface
- let it extend one of the mentioned repository interfaces
- Annotate the interface with
@Repository - implement/add your own repository methods
To Create a Repository Example
- In
CustomerRepository.java
package com.demo;

import org.springframework.data.jpa.repository.JpaRepository;
import org.springframework.stereotype.Repository;

@Repository
public interface CustomerRepository extends JpaRepository<Customer, Long> {}
- In
RestController.java: We Autowire the Repository
package com.demo;

import org.springframework.beans.factory.annotation.Autowired;

@org.springframework.web.bind.annotation.RestController
public class RestController {

  @Autowired
  private CustomerRepository customerRepository;
}
Video 4.5 : Reading and Writing the Database
- Setup Unit Testing :
- Add the Spring boot JUnit dependency
- Create a test class and add the required annotations
- @RunWith : defines the runner the test should run with
- @SpringBootTest : marks the class as a spring boot test (allows us to specify the main class)
Reading and Writing the Database Example
In pom.xml : we add the Unit test dependency
<dependency>
    <groupId>org.springframework.boot</groupId>
    <artifactId>spring-boot-starter-test</artifactId>
    <scope>test</scope>
</dependency>
In src/test/java : We create CustomerRepositoryTest.java
@Repository
public interface CustomerRepository extends JpaRepository<Customer, Long> {}
then to use the repository in a controller / unit test we do
@Autowired
  private CustomerRepository repository ;
Example of Unit Test
//other imports ...
import static org.junit.Assert.assertEquals;

@RunWith(SpringJUnit4ClassRunner.class)
@SpringBootTest(classes = Main.class)
public class CustomerRepositoryTest {

  @Autowired
  private CustomerRepository repository;

  @Test
  public void testRepository() {
    Customer customer = new Customer();
    customer.setName("Tom");
    customer.setAge(40);

    repository.save(customer);
    assertEquals(1, repository.findAll().size()); // confirm save

    Customer loadedCustomer = repository.findById(customer.getId()).get(); // load / read by id
    assertEquals("Tom", loadedCustomer.getName());
    assertEquals(40, loadedCustomer.getAge());

    customer.setName("Peter"); // change name
    repository.save(customer); // update

    Customer updatedCustomer = repository.findById(customer.getId()).get(); // reload by id
    assertEquals("Peter", updatedCustomer.getName()); // check name updated correctly
    assertEquals(40, updatedCustomer.getAge()); // check age unchanged

    repository.delete(customer);
    assertEquals(0, repository.findAll().size()); // confirm deletion
  }
}
Section 5 : Creating a Rest API
Video 5.1 : Introduction to Creating Rest APIs
- Rest :
- Representational State transfer
- way for distributed systems to communicate with each other (client-server)
- Stateless : each request contains all the required information
- Highly scalable
- HTTP Request Methods :
- GET : requests data from the server
- POST : sends data to the server
- PUT : changes/updates data on the server
- DELETE : deletes data from the server
Video 5.2 : Creating a RestController
- Controller : a class responsible for preparing data ( from a model) to be presented in a view
- RestController : a specific type of controller with capabilities for REST APIs
- Annotated with
@RestController
- Annotated with
Creating a RestController Example
In CustomerController.java
@RestController
public class CustomerController {

  @Autowired
  private CustomerRepository repository;
}
Video 5.3 : Creating endpoints for receiving data
- POST endpoint :
- Endpoint that takes data in JSON format and stores it in a repository
- PUT endpoint :
- Endpoint that takes data in JSON format and uses it to update data in a repository
Creating endpoints for receiving data Example
@RestController
public class CustomerController {

  @Autowired
  private CustomerRepository repository;

  @RequestMapping(value = "/customer", method = RequestMethod.POST)
  public Customer save(@RequestBody Customer customer) {
    return repository.save(customer);
  }

  @RequestMapping(value = "/customer", method = RequestMethod.PUT)
  public Customer update(@RequestBody Customer customer) {
    return repository.save(customer);
  }
  //...
}
IMPORANT :
- All endpoints except the delete should return the
customerback.
Testing
- Creating a Customer(JSON POST Request) :
{
  "name": "Tom",
  "age": 26
}
- Updating a Customer (JSON PUT request):
{
  "id": 1,
  "name": "Tommy",
  "age": 27
}
Video 5.4: Creating endpoints for Sending and Deleting Data
GET endpoint :
- Endpoint that loads data from a repository and sends it in JSON format
DELETE endpoint :
- Endpoint that removes data from a repository
Creating endpoints for Sending and Deleting Data Example
@RequestMapping(value ="/customer/{id}", method=RequestMethod.GET)
    public Customer get(@PathVariable Long id)
    {
        return repository.findById(id).orElse(null); // we can use .get()
    }
    @RequestMapping(value="customer/{id}",method=RequestMethod.DELETE)
    public void delete(@PathVariable Long id)
    {
        repository.deleteById(id);
    }
Notes:
- we need the id to perform delete and get. We use
@PathVariable
Video 5.5: Testing the Endpoints
This part concerns unit Testing. Check the videos if you're curious
Section 6 : Going Reactive with Spring
Video 6.1 : Introduction to Spring Reactive
- Reactive Programming :
- Approach to process data asynchronously without any blocking IO operation
- Instead of waiting for an async operation to finish (and block the thread) reactive programming relies on observable streams.
- reactivity : the principle relies on reacting to changes happening on an observed stream.
- Two instances :
- A publisher : publishes events on the stream
- A subscriber : who reacts to those events.
Webflux:- fully supports non blocking reactive streams
- Uses two publishers
- Mono\<T> : for handling 0 or 1 element
- Flux <T> : fir handling 0 to N element(s)
- Flux can return a list of elements, or indefinitely emit new elements to the stream
- API is reactive it it returns objects wrapped in
MonoorFlux
Adding the Webflux Dependency
In pom.xml
<dependency>
    <groupId>org.springframework.boot</groupId>
    <artifactId>spring-boot-starter-webflux</artifactId>
</dependency>
Video 6.2 : Creating a Reactive Repository
- JPA doesn't support reactive streams, so we're using a
HashMapas a database.
package com.demo;

import java.util.HashMap;
import java.util.Map;
import org.springframework.stereotype.Repository;
import reactor.core.publisher.Flux;
import reactor.core.publisher.Mono;

@Repository
public class ReactiveCustomerRepository {

  private static Map<Long, Customer> customers = new HashMap<>();

  Mono<Customer> save(Customer customer) {
    customers.put(customer.getId(), customer);
    return Mono.justOrEmpty(customer);
  }

  Mono<Customer> findById(Long id) {
    return Mono.justOrEmpty(customers.get(id));
  }

  Flux<Customer> findAll() {
    return Flux.fromIterable(customers.values());
  }

  Mono<Customer> deleteById(Long id) {
    return Mono.justOrEmpty(customers.remove(id));
  }
}
Video 6.3 : Creating a Reactive RestController
@RestController
public class CustomerController {

  @Autowired
  private ReactiveCustomerRepository repository;

  @RequestMapping(value = "/customer", method = RequestMethod.POST)
  public Mono<Customer> save(@RequestBody Customer customer) {
    return repository.save(customer);
  }

  @RequestMapping(value = "/customer", method = RequestMethod.PUT)
  public Mono<Customer> update(@RequestBody Customer customer) {
    return repository.save(customer);
  }

  @RequestMapping(value = "/customer/{id}", method = RequestMethod.GET)
  public Mono<Customer> get(@PathVariable Long id) {
    return repository.findById(id);
  }

  @RequestMapping(value = "/customer", method = RequestMethod.GET)
  public Flux<Customer> getAll() {
    return repository.findAll();
  }

  @RequestMapping(value = "customer/{id}", method = RequestMethod.DELETE)
  public void delete(@PathVariable Long id) {
    repository.deleteById(id);
  }
}